Page 1 of 2
Re: Disabling Upper RAM
Posted: Tue May 05, 2020 1:06 pm
by dfzx
HappyLittleDiodes wrote: ↑Tue May 05, 2020 11:00 am
No it's a sticky copper tape for electronic repairs. You tidy up the damage, stick this over and solder it in.
I tried to make the link with a small wire but buggered it up

Something else I never knew existed.

Re: Disabling Upper RAM
Posted: Tue May 05, 2020 1:20 pm
by HappyLittleDiodes
I've never used it before but it seems like a good solution, fingers crossed, if I make a mess again it's going to get harder to fix
Re: Disabling Upper RAM
Posted: Wed May 06, 2020 12:14 pm
by speccyplus
Don't feel bad, I managed to lift about 4 traces too, removing all the chips on my board. Most of them from chips that were already replaced by a PO and I suspect damaged them.
Its a tricky board to remove chips from. Patience is key, as in flux and re-flowing - fresh solder.
Re: Disabling Upper RAM
Posted: Wed May 06, 2020 2:26 pm
by speccyplus
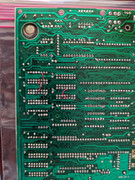
For you feel better pleasure. Top side just had a few traces, bottom was a disaster ground. I did the full nuke on removing all the upper ram and logic chips and for some reason that section gave me all the trouble (ram). Rest was 98% fine. Good news is I have a fully socketed board once I get that last two sockets in.
Not my best work or my most proud, I have never had so much trouble desoldering components than on this board being so fragile.
So many pads came off on the 32k section from previous damage. Not needed as they were not connected to anything, but still. Next time I will try the thin wire repairs hidden by the socket, that I have seen folks do. You need a steady hand...
https://www.youtube.com/watch?v=KRSQOOY67DU

Re: Disabling Upper RAM
Posted: Wed May 06, 2020 2:53 pm
by HappyLittleDiodes
speccyplus wrote: ↑Wed May 06, 2020 2:26 pm
For you feel better pleasure. Top side just had a few traces, bottom was a disaster ground. I did the full nuke on removing all the upper ram and logic chips and for some reason that section gave me all the trouble (ram). Rest was 98% fine. Good news is I have a fully socketed board once I get that last two sockets in.
Not my best work or my most proud, I have never had so much trouble desoldering components than on this board being so fragile.
So many pads came off on the 32k section from previous damage. Not needed as they were not connected to anything, but still. Next time I will try the thin wire repairs hidden by the socket, that I have seen folks do. You need a steady hand...
https://www.youtube.com/watch?v=KRSQOOY67DU
Did you use a heat gun to help with removing the chips?
I find it makes the actual removal a lot smoother, but you still have to take the time to get as much solder out as possible!
I'll let you know how I get on using the tape
Re: Disabling Upper RAM
Posted: Wed May 06, 2020 3:10 pm
by 1024MAK
The normal answer to removing chips (this assumes the chip is being removed because it’s faulty) is to cut all of it’s pins as close to the plastic package as possible. Remove the plastic package, then each pin can be removed with long nose pliers while the solder is kept molten with the hot iron.
Of course this is no good if you want to reuse the chip... then the best method is hot air, but you have to get things just right...
Mark
Re: Disabling Upper RAM
Posted: Wed May 06, 2020 4:35 pm
by HappyLittleDiodes
Thanks Mark.
Yes I'm a bit concerned about the heat gun. No problems so far but I find it a bit unrefined when the board gets a bit wobbly with the heat
Re: Disabling Upper RAM
Posted: Wed May 06, 2020 6:16 pm
by HappyLittleDiodes
Re: Disabling Upper RAM
Posted: Wed May 06, 2020 7:25 pm
by speccyplus
HappyLittleDiodes wrote: ↑Wed May 06, 2020 2:53 pm
speccyplus wrote: ↑Wed May 06, 2020 2:26 pm
For you feel better pleasure. Top side just had a few traces, bottom was a disaster ground. I did the full nuke on removing all the upper ram and logic chips and for some reason that section gave me all the trouble (ram). Rest was 98% fine. Good news is I have a fully socketed board once I get that last two sockets in.
Not my best work or my most proud, I have never had so much trouble desoldering components than on this board being so fragile.
So many pads came off on the 32k section from previous damage. Not needed as they were not connected to anything, but still. Next time I will try the thin wire repairs hidden by the socket, that I have seen folks do. You need a steady hand...
https://www.youtube.com/watch?v=KRSQOOY67DU
Did you use a heat gun to help with removing the chips?
I find it makes the actual removal a lot smoother, but you still have to take the time to get as much solder out as possible!
I'll let you know how I get on using the tape
I have a power vacuum solder sucker, and it was horrible, it usually works quite well. I had better luck with a manual sucker, and cleaning the holes out that way.
For whatever reason extracting solder from the upper ram I ran into nothing coming out well. Other chips usually sucked them clean and I could gently push the sides of the chips to free them from within the holes.
No heat gun.