hmm the website must be slow it says its still uploading... let me see if I can find another host..
http://s000.tinyupload.com/?file_id=248 ... 7835222099
Crap 0.1 first assembly project

Re: Crap 0.1 first assembly project
I like the twiddlediddlydiddley-plips. Not so keen on the DeeeDuuhhh.
Re: Crap 0.1 first assembly project
Yea thet twiddlediddlydiddley plips were manually written. the DeeDuuuhh's are the random generated sounds. I thought perhaps it would be a cheesy way to give some variety to the game but as you say they sound pants.
I think a more tightly constrained random number generation (at the moment it returns 0-255) that is why the DeeDuuuhhs are so short in many cases. Will pad them with a 50 and see if that improves things...
this is the soundfx file from the program.
Code: Select all
;r-tapes sounds
zap:
	ld d,16		;speaker = bit 4
	ld e,0		;distance between speaker move counter
	ld b,255	;overall length counter
blp0:	ld a,d
	and 248		;keep border colour the same
	out (254),a	;move the speaker in or out depending on bit 4
	cpl		;toggle, so we alternative between speaker in and out to make sound
	ld d,a		;store it
	ld c,e		;now a pause
blp1:	dec c
	jr nz,blp1
	dec e		;change to inc e to reverse the sound, or remove to make it a note
	djnz blp0	;repeat B=255 times
	ret

wiggy:
	ld d,100
	ld e,50
	ld b,60
	call soundFXGen

	ld d,90
	ld e,50
	ld b,60
	call soundFXGen

	ld d,80
	ld e,50
	ld b,60
	call soundFXGen

	ld d,70
	ld e,50
	ld b,60
	call soundFXGen

	ld d,60
	ld e,50
	ld b,60
	call soundFXGen

	ld d,50
	ld e,50
	ld b,60
	call soundFXGen

	ld d,40
	ld e,50
	ld b,60
	call soundFXGen

	ld d,30
	ld e,50
	ld b,60
	call soundFXGen

	ld d,20
	ld e,50
	ld b,60
	call soundFXGen

	ld d,10
	ld e,50
	ld b,60
	call soundFXGen

	ld d,1
	ld e,50
	ld b,60
	call soundFXGen

	ld d,255
	ld e,50
	ld b,60
	call soundFXGen

	ret
;soundFX subroutine, corupted with the simple prandom from Chuntey blog.
;not as groovy as P Rak's random function but this is very simple subroutine

rndSoundFXGen:
	call randomChuntey
	add a,50
	and 255
	ld d,a
	call randomChuntey
	add a,50
	and 255
	ld e,a
	call randomChuntey
	add a,50
	and 255
	ld b,a
;butchered from soundFX.
soundFXGen:
_S1:     push bc
	ld a,($5C48)		; 11T
	srl a
	srl a
	srl a
	set 4,a			; 8T
	out(254),a		; 11T
	ld b,d
_S2:	nop			; 4T
	nop			; 4T
	nop			; 4T
	djnz _S2		; 50021
	res 4,a
	out(254),a		; 11T
	ld b,e
_S3:	nop			; 4T
	nop			; 4T
	nop			; 4T
	djnz _S3		; 50031
	nop
	dec e			; 4T
	inc d			; 4T
	inc e			; 4T
	pop bc			; 10T
	djnz _S1		; 50006
	ret

Re: Crap 0.1 first assembly project
I've never been able to get local definitions to work.
 Potato tip:
This is where the documentation is lacking. What's the syntax for using the LOCAL command?
If I've got a bit of code I want to repeat between REPT / ENDM markers, and I put a label in it, it throws up an error as the label counts as a redefinition the second time it's repeated. But every way I can think of for trying to define the label as local to the REPT macro fails.
Re: Crap 0.1 first assembly project
example. when I assemble crapchess, its just..Joefish wrote: ↑Thu Jan 11, 2018 2:11 pm I've never been able to get local definitions to work.
This is where the documentation is lacking. What's the syntax for using the LOCAL command?
If I've got a bit of code I want to repeat between REPT / ENDM markers, and I put a label in it, it throws up an error as the label counts as a redefinition the second time it's repeated. But every way I can think of for trying to define the label as local to the REPT macro fails.
Code: Select all
pasmo --tapbas --alocal main.asm main.tap
in the files themselves its looks like...
Code: Select all
soundFXGen:
_S1:     push bc
	ld a,($5C48)		; 11T
	srl a
	srl a
	srl a
	set 4,a			; 8T
	out(254),a		; 11T
	ld b,d
_S2:	nop			; 4T
	nop			; 4T
	nop			; 4T
	djnz _S2		; 50021
	res 4,a
	out(254),a		; 11T
	ld b,e
_S3:	nop			; 4T
	nop			; 4T
	nop			; 4T
	djnz _S3		; 50031
	nop
	dec e			; 4T
	inc d			; 4T
	inc e			; 4T
	pop bc			; 10T
	djnz _S1		; 50006
	ret

soundFXGen2:
_S1:     push bc
	ld a,($5C48)		; 11T
	srl a
	srl a
	srl a
	set 4,a			; 8T
	out(254),a		; 11T
	ld b,d
_S2:	nop			; 4T
	nop			; 4T
	nop			; 4T
	djnz _S2		; 50021
	res 4,a
	out(254),a		; 11T
	ld b,e
_S3:	nop			; 4T
	nop			; 4T
	nop			; 4T
	djnz _S3		; 50031
	nop
	dec e			; 4T
	inc d			; 4T
	inc e			; 4T
	pop bc			; 10T
	djnz _S1		; 50006
	ret
From the link bellow - I always thought it was impossible to use local labels in pasmo but I thought I would double check and boom in the docs..
http://pasmo.speccy.org/pasmodoc.html#sourcelabeln the autolocal mode, introduced by using the --alocal command line option, all labels that begins with a '_' are locals. His ambit ends at the next non local label or in the next PROC, LOCAL, MACRO, ENDP or ENDM directive.
Both automatic and explicit local labels are represented in the symbol table listing as 8 digit hexadecimal numbers, corresponding to the first use of the label in the source.
I still don't understand how the macro expansion stuff works with pasmo its a bit of a mind bender. You are right about the documentation for pasmo it could be better/more extensive.
I could never get the LOCAL syntax to work either, but when I tried the --alocal way, you don't need to use LOCAL it just assumes that all labels that start with _ are local.

Re: Crap 0.1 first assembly project
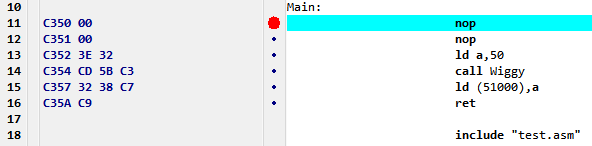
Here's a Zeus tape generation example:
Make sure you right-click in the editor and choose Toggle Code. The wide left margin shows assembled bytes and the addresses they get assembled to.
Code: Select all
; wiggymain.asm

zeusemulate             "48K"                           ; Tell the Zeus emulator to be a 48K Spectrum.
org                     50000                           ; Tell the Zeus assembler where to place the code.
Stack                   equ $FF40                       ; $FF40 is the value of SP on entry from RANDOMIZE USR on a 48K model.
Zeus_SP                 equ Stack                       ; Tell the Zeus emulator where to set the stack pointer
                                                        ;   (not needed in new versions of Zeus; older versions of
                                                        ;   Zeus reset SP to $0000 after outputting a tap or tzx).

Main:
                        nop
                        nop
                        ld a,50
                        call Wiggy
                        ld (51000),a
                        ret

                        include "test.asm"


TapStart                equ Main                        ; Start address of bytes to save in the LOAD "" CODE block after the tape's BASIC loader.
TapEnd                  equ $                           ; End address of bytes to save in the LOAD "" CODE block after the tape's BASIC loader.
TapSize                 equ TapEnd-TapStart             ; Length of bytes to save in the LOAD "" CODE block after the tape's BASIC loader.
EntryPoint              equ Main                        ; Entry point (what the BASIC loader calls with RANDOMISE USR nnnnn).
TapMode                 equ 2                           ; Mode 2 is standard TAP (not speedloader etc).

                        output_tap "wiggy.tap", "Wiggy", "Comment", TapStart, TapSize, TapMode, EntryPoint
                        output_tzx "wiggy.tzx", "Wiggy", "Comment", TapStart, TapSize, TapMode, EntryPoint
                        output_z80 "wiggy.z80", Stack, TapStart
                        //output_szx "wiggy.szx", Stack, TapStart ; Zeus generates SZX files in interrupt mode 2, which
                                                                  ;   need tweaking to get them returning to BASIC.

end                     EntryPoint                      ; Tell the Zeus emulator where to start running code at.
Code: Select all
; test.asm

Wiggy:
        ld a, 100
        ret
Robin Verhagen-Guest
SevenFFF / Threetwosevensixseven / colonel32
NXtel • NXTP • ESP Update • ESP Reset • CSpect Plugins
SevenFFF / Threetwosevensixseven / colonel32
NXtel • NXTP • ESP Update • ESP Reset • CSpect Plugins
Re: Crap 0.1 first assembly project
That is all kinds of awesome, thanks Seven_FFF now I can start tackling your tutorial soon 
Being able to examine the byte code like that is very nice.
Is there a manual for zeus? I know there are many examples on the website but I couldn't find a pdf of the manual. I guess there are options for generating things like microdrive/floppy disk?
Being able to examine the byte code like that is very nice.
Is there a manual for zeus? I know there are many examples on the website but I couldn't find a pdf of the manual. I guess there are options for generating things like microdrive/floppy disk?
Re: Crap 0.1 first assembly project
Zeus has rich handling and scoping of local labels. This is a deliberately baroque example to show what's possible if you were insane enough:joefish wrote: If I've got a bit of code I want to repeat between REPT / ENDM markers, and I put a label in it, it throws up an error as the label counts as a redefinition the second time it's repeated. But every way I can think of for trying to define the label as local to the REPT macro fails.
Code: Select all
; label-scoping.asm                                             ; This example doesn't do anything if you run it,
                                                                ; but it is instructive to see how it gets assembled!

zeusemulate             "48K"                                   ; Tell the Zeus emulator to be a 48K Spectrum.
org                     50000                                   ; Tell the Zeus assembler where to place the code.
Stack                   equ $FF40                               ; $FF40 is the value of SP on entry from RANDOMIZE USR on a 48K model.
Zeus_SP                 equ Stack                               ; Tell the Zeus emulator where to set the stack pointer
                                                                ;   (not needed in new versions of Zeus; older versions of
                                                                ;   Zeus reset SP to $0000 after outputting a tap or tzx).
Zeus_PC                 equ labelGlobalA                        ; Tell the Zeus emulator where to start running code.


labelGlobalA:           ret                                     ; Global labels can be back-referenced from later code.

Menu                    proc                                    ; Named proc. All labels defined inside (except those scoped with ::) are local to that proc.
labelNamedProcA:          nop                                   ; Labels in named procs can be back- or forward referenced.
                          for loop1 = 1 to 5                    ; Assembly-time loop.
                            proc                                ; Anonymous proc inside the loop. All labels defined inside get a separate symbol instance and value for each loop iteration.
label1A:                      nop                               ; Labels in anonymous procs can be back- or forward referenced.
                              jp Menu.labelNamedProcA           ; You can refer to labels defined in any named proc
                              jp Menu.labelNamedProcB           ;   with [proc].[label] dot notation.
                              jp ^^^^labelGlobalA               ; Each pair of ^^ jumps up one level
                              jp ^^^^labelGlobalB               ;   to resolve labels in a parent scope.
                              jp labelGlobalA                   ; Local labels in current scope need no qualification.
                              jp ::labelGlobalB                 ; You can refer to global labels with :: prefix from anywhere.
                              for loop2 = 1 to 3                ; A second assembly-time loop nested inside the first one.
                                proc                            ; Another Anonymous proc inside the inner loop.
label2A:                          nop                           ; Labels in anonymous procs can be back- or forward referenced.
                                  jp ^^label1A                  ; ^^ Scopes up one level to refer
                                  jp ^^label1B                  ;    to label inside outer anon proc.
                                  jp ^^^^labelNamedProcA        ; ^^ Scopes up two levels to refer
                                  jp ^^^^labelNamedProcB        ;    to label inside named proc proc.
                                  jp Menu.labelNamedProcA       ; Or refer to same proc proc label
                                  jp Menu.labelNamedProcB       ;    directly with dot notation.
                                  jp labelGlobalA               ; Local labels in current scope
                                  jp labelGlobalB               ;    need no qualification.
                                  jp ::labelGlobalA             ; You can refer to global labels
                                  jp ::labelGlobalB             ;    with :: prefix from anywhere.
label2B:                          nop                           ; Enclosing labels can also be forward-referenced from earlier code.
                                pend                            ; Closing inner anon proc.
                              next ; loop2                      ; Closing inner loop.
label1B:                      nop                               ; Enclosing labels can also be forward-referenced from earlier code.
                            pend                                ; Closing outer anon proc.
                          next ; loop1                          ; Closing outer loop.
labelNamedProcB:          nop                                   ; Enclosing labels can also be forward-referenced from earlier code.
                          jp labelNamedProcA                    ; Local labels in current scope need no qualification, whether back-
                          jp labelNamedProcB                    ;   or forward-referenced.
                          jp Menu.labelNamedProcA               ; Labels in named procs can be referenced with dot notation, whether back-
                          jp Menu.labelNamedProcB               ;   or forward-referenced.
                          jp labelGlobalA                       ; Global labels can be referenced without :: notation, whether back-
                          jp labelGlobalB                       ;   or forward-referenced, provided they are unambiguous.
                          jp ^^labelGlobalA                     ; Global labels can also be referenced with ^^  notation, whether back-
                          jp ^^labelGlobalB                     ;   or forward-referenced, from a first-level named or anonymous proc.
                          jp ::labelGlobalA                     ; Global labels can always be referenced with :: notation, whether back-
                          jp ::labelGlobalB                     ;   or forward-referenced.
pend
labelGlobalB:             nop                                   ; Global labels can also be forward-referenced from earlier code.
                          jp Menu_4_2.label2A                   ; Any instance-named symbol can be DIRECTLY referenced from anywhere. Use with caution!
                          		        		; Procs (both named and anonymous) and macros open up a new child scope. Other assembly-time
                          		        		; directlves (loops etc) don't. Hence why each loop here has an anon proc immediately inside.
                          		        		; Here there are three nested scopes (Main, outer anon and inner anon).
                          		        		; Nested scopes inside loops get a new scope instance for each iteration of the loop.
                          		        		; Nesting loops *and* scopes gets a new scope instance for each combination of iterations.
                          					; You can see this in the symbol naming below. FOr example in Menu_3_2.label2A,
                          					; Global is an implicit outer scope, "Menu" is the named proc scope, "3" is the scope inside the outer
                          					; anon proc, and "2" is the scope inside the inner named proc. All this gives a unique scope name for
                          					; that scope instance, then ".label2A" refers to the "label2A" label inside that scope instance.

; All this still assembles in only four passes!

; Symbol list generated by Zeus:

; labelGlobalA                    EQU $C350
; labelGlobalB                    EQU $C5B5
; loop1                           EQU $0006
; loop2                           EQU $0004
; Menu                            EQU $C351
; Menu.labelNamedProcA            EQU $C351
; Menu.labelNamedProcB            EQU $C596
; Menu_0.label1A                  EQU $C352
; Menu_0.label1B                  EQU $C3C5
; Menu_0_0.label2A                EQU $C365
; Menu_0_0.label2B                EQU $C384
; Menu_0_1.label2A                EQU $C385
; Menu_0_1.label2B                EQU $C3A4
; Menu_0_2.label2A                EQU $C3A5
; Menu_0_2.label2B                EQU $C3C4
; Menu_1.label1A                  EQU $C3C6
; Menu_1.label1B                  EQU $C439
; Menu_1_0.label2A                EQU $C3D9
; Menu_1_0.label2B                EQU $C3F8
; Menu_1_1.label2A                EQU $C3F9
; Menu_1_1.label2B                EQU $C418
; Menu_1_2.label2A                EQU $C419
; Menu_1_2.label2B                EQU $C438
; Menu_2.label1A                  EQU $C43A
; Menu_2.label1B                  EQU $C4AD
; Menu_2_0.label2A                EQU $C44D
; Menu_2_0.label2B                EQU $C46C
; Menu_2_1.label2A                EQU $C46D
; Menu_2_1.label2B                EQU $C48C
; Menu_2_2.label2A                EQU $C48D
; Menu_2_2.label2B                EQU $C4AC
; Menu_3.label1A                  EQU $C4AE
; Menu_3.label1B                  EQU $C521
; Menu_3_0.label2A                EQU $C4C1
; Menu_3_0.label2B                EQU $C4E0
; Menu_3_1.label2A                EQU $C4E1
; Menu_3_1.label2B                EQU $C500
; Menu_3_2.label2A                EQU $C501
; Menu_3_2.label2B                EQU $C520
; Menu_4.label1A                  EQU $C522
; Menu_4.label1B                  EQU $C595
; Menu_4_0.label2A                EQU $C535
; Menu_4_0.label2B                EQU $C554
; Menu_4_1.label2A                EQU $C555
; Menu_4_1.label2B                EQU $C574
; Menu_4_2.label2A                EQU $C575
; Menu_4_2.label2B                EQU $C594
; Stack                           EQU $FF40
; Zeus_PC                         EQU $C350
; Zeus_SP                         EQU $FF40
Last edited by Seven.FFF on Thu Jan 11, 2018 5:34 pm, edited 5 times in total.
Robin Verhagen-Guest
SevenFFF / Threetwosevensixseven / colonel32
NXtel • NXTP • ESP Update • ESP Reset • CSpect Plugins
SevenFFF / Threetwosevensixseven / colonel32
NXtel • NXTP • ESP Update • ESP Reset • CSpect Plugins
Re: Crap 0.1 first assembly project
Nope, no PDF. Half the documentation is in the website example files, and the other half is in the History section of the About screen. The only thing really missing is an overall structure. I did mull over making a wiki, but I'm not sure I could maintain it in the longer term.Nomad wrote: ↑Thu Jan 11, 2018 4:15 pm That is all kinds of awesome, thanks Seven_FFF now I can start tackling your tutorial soon
Being able to examine the byte code like that is very nice.
Is there a manual for zeus? I know there are many examples on the website but I couldn't find a pdf of the manual. I guess there are options for generating things like microdrive/floppy disk?
I usually download this, unzip into a directory, download the history text into the same directory, then use grep/whatever to search through the whole thing.
Simon is very amenable to questions (and making improvements arising from questions and discussions). As am I (well the questions if not the improvements!). If you're on facebook messenger, hit him or me up on there.
Robin Verhagen-Guest
SevenFFF / Threetwosevensixseven / colonel32
NXtel • NXTP • ESP Update • ESP Reset • CSpect Plugins
SevenFFF / Threetwosevensixseven / colonel32
NXtel • NXTP • ESP Update • ESP Reset • CSpect Plugins
Re: Crap 0.1 first assembly project
So when it comes to PASMO, nobody knows?
I'll be adding the auto locals directive to my builds in future anyway.
I'll be adding the auto locals directive to my builds in future anyway.
Re: Crap 0.1 first assembly project
Works for me Jason, but it does need a proc/endp inside the rept/endm, despite what the doumentation says. It that respect it works the same way as Zeus.
Without --alocal, fail:
Code: Select all
org 32768

Test:
	rept 4
          proc
_A:
	    jp _A
          endp
        endm
 	ret

end 32768
Code: Select all
C:\Users\robin\Documents\Visual Studio 2015\Projects\ZalaXa\src>pasmo --tapbas --alocal test.asm test.tap test.txt

C:\Users\robin\Documents\Visual Studio 2015\Projects\ZalaXa\src>
Code: Select all
00000000	EQU 08000H
00000001	EQU 08003H
00000002	EQU 08006H
00000003	EQU 08009H
Test		EQU 08000H
Code: Select all
C:\Users\robin\Documents\Visual Studio 2015\Projects\ZalaXa\src>pasmo --tapbas test.asm test.tap test.txt
ERROR on line 6 of file test.asm
ERROR: Invalid definition, previously defined as EQU or label
Robin Verhagen-Guest
SevenFFF / Threetwosevensixseven / colonel32
NXtel • NXTP • ESP Update • ESP Reset • CSpect Plugins
SevenFFF / Threetwosevensixseven / colonel32
NXtel • NXTP • ESP Update • ESP Reset • CSpect Plugins
Re: Crap 0.1 first assembly project
Day 12: 353 days left..
With the anykey subroutine doing a good job of not crashing the program. It was time to get a little more precise/discerning with the keyboard input. Debugging the fallout from the following code will probably take up a lot of the project time today. But without it there is no real interaction beyond anykey on the menus (and later the main game). So it pays to get this right as soon as possible.
The code is from Chuntey blog. https://chuntey.wordpress.com/2012/12/1 ... chapter-2/ I adapted it to call the various menus instead of up,down.left,right. Now me at 3am in the morning probably was more potato than me fully refreshed so lets hope I can see the obvious errors that were hanging the program and making it unresponsive.
First the code.
this is the main.asm for crapchess
this is the mainmenu.asm - where the information about the main menu screen lives
this is the keyboard.asm file. Where all the keyboard input subroutines live.
as a sanity check I did a direct copy paste from the blog, and just replace the subroutine jumps to my program menus. (keyboardTest1234)..
when keyboardTest12345 is called none of the keys respond...
have the menu screen set a memory location to hold the subroutines in order like.
CHOICE1, CHOICE2, CHOICE3, CHOICE4, CHOICE5
then calls the keyboard input subroutine,
the subroutine looks at memory location X, then if key 1 is pressed, call subroutine from memory location[1]
the subroutine looks at memory location X, then if key 2 is pressed, call subroutine from memory location[2]
the subroutine looks at memory location X, then if key 3 is pressed, call subroutine from memory location[3]
the subroutine looks at memory location X, then if key 4 is pressed, call subroutine from memory location[4]
the subroutine looks at memory location X, then if key 5 is pressed, call subroutine from memory location[5]
That way I could have menu key input as a subroutine, and just pass the subroutines for the calls to the memory location for each menu page. Making things a lot more tidy if you see what I mean.
I think these would be described as 'jump tables'
Another weird issue I have been having is trying to get fuse to load the outlet microdrives from the archive. There are some nice programs contained in this magazine but most of the issues are distributed as microdrive only. is there a way I can load these into fuse?
A fair question is ... why bother searching the archives for 'skillz', well using my potato logic mostly derived from Dragonlance novels: I equate the archive to being a similar situation with finding the ancient tombs + Fistandantilus spell books. But saying 'nah bro.. who needs that..'
Just browsing I notice there are routines for screen wipes, scrolls and other interesting effects that would make my projects look better. my plan was to scour the archive for every useful assembly routine/technique and compile them into a wiki. If the 'skills' were arranged in modular form it would be pretty useful and furthermore could only help me learn.
The plan was to go from this..

to this...

with Assembly gains
Any tips to good assembly routines in the archives would be appreciated.
With the anykey subroutine doing a good job of not crashing the program. It was time to get a little more precise/discerning with the keyboard input. Debugging the fallout from the following code will probably take up a lot of the project time today. But without it there is no real interaction beyond anykey on the menus (and later the main game). So it pays to get this right as soon as possible.
The code is from Chuntey blog. https://chuntey.wordpress.com/2012/12/1 ... chapter-2/ I adapted it to call the various menus instead of up,down.left,right. Now me at 3am in the morning probably was more potato than me fully refreshed so lets hope I can see the obvious errors that were hanging the program and making it unresponsive.
First the code.
this is the main.asm for crapchess
Code: Select all
org 50000

include "changebordercolour.asm"
include "changeinkpaper.asm"
include "mainmenu.asm"
include "keyboard.asm"
include "clearscreen.asm"
include "splashscreen.asm"
include "soundfx.asm"
include "random.asm"

Main:
	call randomChuntey
	and 7
	call rndSoundFXGen
	call changeBorderColour
	call randomChuntey
	and 255
	call changeInkPaper
	call clearScreenRom
	call splashScreen
	call keyboardAnyKPress
	call wiggy
	call blp1
	call randomChuntey
	and 7
	call changeBorderColour
	call randomChuntey
	and 255
	call changeInkPaper
	call clearScreenRom
	call mainMenuScreen
	; call keyboardAnyKPress
	call wiggy
	call rndSoundFXGen
	call randomChuntey
	and 7
	call changeBorderColour
	call randomChuntey
	and 255
	call changeInkPaper
	call clearScreenRom
	call gameMenuScreen
	call keyboardAnyKPress
	call rndSoundFXGen
	call randomChuntey
	and 7
	call changeBorderColour
	call randomChuntey
	and 255
	call changeInkPaper
	call clearScreenRom
	call aboutMenuScreen
	call keyboardAnyKPress
	call wiggy
	call rndSoundFXGen
	call randomChuntey
	and 7
	call changeBorderColour
	call randomChuntey
	and 255
	call changeInkPaper
	call clearScreenRom
	call soundMenuScreen
	call keyboardAnyKPress
	call wiggy
	call rndSoundFXGen
	call randomChuntey
	and 7
	call changeBorderColour
	call randomChuntey
	and 255
	call changeInkPaper
	call clearScreenRom
	call controlsMenuScreen
	call keyboardAnyKPress
	call rndSoundFXGen
	call randomChuntey
	and 7
	call changeBorderColour
	call randomChuntey
	and 255
	call changeInkPaper
	call clearScreenRom
	call helpMenuScreen
	call keyboardAnyKPress
	call wiggy
	call rndSoundFXGen
	call randomChuntey
	and 7
	call changeBorderColour
	call randomChuntey
	and 255
	call changeInkPaper
	call clearScreenRom
	call attractScreen
	call keyboardAnyKPress
	call wiggy
	call rndSoundFXGen
	call randomChuntey
	and 7
	call changeBorderColour
	call clearScreenRom
	call quitMenuScreen
	call keyboardAnyKPress
	call rndSoundFXGen
	call randomChuntey
	and 7
	call changeBorderColour
	call clearScreenRom
	call highScoreMenu
	ld (51000),a
	jp Main
	ret
end Main
Code: Select all
include "test.asm"
include "helpmenu.asm"
include "controlsmenu.asm"
include "gamemenu.asm"
include "soundmenu.asm"
include "aboutmenu.asm"
include "quitmenu.asm"
include "highscoremenu.asm"

mainMenuScreen:
	ld a, 2
	call 5633
	ld de, mainMenuString
	ld bc, eostr2-mainMenuString
	call 8252
	call keyboardTest1234
	ret

mainMenuString: defb 22,2,8,"Main Menu screen."
		defb 13,"1:MENU 1"
		defb 13,"2:MENU 2"
		defb 13,"3:MENU 3"
		defb 13,"4:MENU 4"
		defb 13,"5:MENU 5"
		defb 13,"6:MENU 6"
		defb 13,"7:MENU 7"
eostr2: equ $
as a sanity check I did a direct copy paste from the blog, and just replace the subroutine jumps to my program menus. (keyboardTest1234)..
Code: Select all
keyboardAnyKPress:
		ld hl,23560     ; LAST K system variable.
		ld (hl),0       ; put null value there

_loop:
		ld a,(hl)       ; new value of LAST K.
		cp 0            ; is it still zero?
		jr z,_loop    ; yes, so no key pressed.
		ret             ; key was pressed.

keyboardTest1234:
       ld bc,63486         ; keyboard row 1-5/joystick port 2.
       in a,(c)            ; see what keys are pressed.
       rra                 ; outermost bit = key 1.
       push af             ; remember the value.
       call nc,aboutMenuScreen         ; it's being pressed, move left.
       pop af              ; restore accumulator.
       rra                 ; next bit along (value 2) = key 2.
       push af             ; remember the value.
       call nc,gameMenuScreen         ; being pressed, so move right.
       pop af              ; restore accumulator.
       rra                 ; next bit (value 4) = key 3.
       push af             ; remember the value.
       call nc,soundMenuScreen         ; being pressed, so move down.
       pop af              ; restore accumulator.
       rra                 ; next bit (value 8) reads key 4.
       call nc,controlsMenuScreen         ; it's being pressed, move up.
       ret


keyboardTest12345:
	ld bc,63486	; keyboard row 1-5/joystick p2
	in a,(c)	; see what keys are pressed
	rra		; outermost bit = key 1
	push af		; remember the value
	call nc,aboutMenuScreen	; its being pressed - load about menu
	pop af		; restore accumulator
	rra		; next bit along (value2) = key 2
	push af		; remember the value
	call nc,gameMenuScreen 	; its being pressed - load game menu
	pop af		; restore accumulator
	rra		; next bit along (value4) = key 3
	push af		; remember the value
	call nc,soundMenuScreen	; its being pressed - load sound menu
	pop af		; restore accumulator
	rra		; next bit along (value8) = key 4
	push af		; remember the value
	call nc,controlsMenuScreen ; its being pressed - load control main
	pop af		; restore accumulator
	rra		; next bit along (value16) = key 5
	push af		; remember the value
	call nc,helpMenuScreen ; its being pressed - load help menu
	ret
have the menu screen set a memory location to hold the subroutines in order like.
CHOICE1, CHOICE2, CHOICE3, CHOICE4, CHOICE5
then calls the keyboard input subroutine,
the subroutine looks at memory location X, then if key 1 is pressed, call subroutine from memory location[1]
the subroutine looks at memory location X, then if key 2 is pressed, call subroutine from memory location[2]
the subroutine looks at memory location X, then if key 3 is pressed, call subroutine from memory location[3]
the subroutine looks at memory location X, then if key 4 is pressed, call subroutine from memory location[4]
the subroutine looks at memory location X, then if key 5 is pressed, call subroutine from memory location[5]
That way I could have menu key input as a subroutine, and just pass the subroutines for the calls to the memory location for each menu page. Making things a lot more tidy if you see what I mean.
I think these would be described as 'jump tables'
Another weird issue I have been having is trying to get fuse to load the outlet microdrives from the archive. There are some nice programs contained in this magazine but most of the issues are distributed as microdrive only. is there a way I can load these into fuse?
A fair question is ... why bother searching the archives for 'skillz', well using my potato logic mostly derived from Dragonlance novels: I equate the archive to being a similar situation with finding the ancient tombs + Fistandantilus spell books. But saying 'nah bro.. who needs that..'
Just browsing I notice there are routines for screen wipes, scrolls and other interesting effects that would make my projects look better. my plan was to scour the archive for every useful assembly routine/technique and compile them into a wiki. If the 'skills' were arranged in modular form it would be pretty useful and furthermore could only help me learn.
The plan was to go from this..
to this...
with Assembly gains
Any tips to good assembly routines in the archives would be appreciated.
Re: Crap 0.1 first assembly project
As an addition to todays progress report, now the project code is starting to get quite large, and having multiple source files. Even with lots of comments and my wibble in this development log even I am starting to find it difficult to keep track of what such and such subroutine does in the program and how it fits into the overall picture.
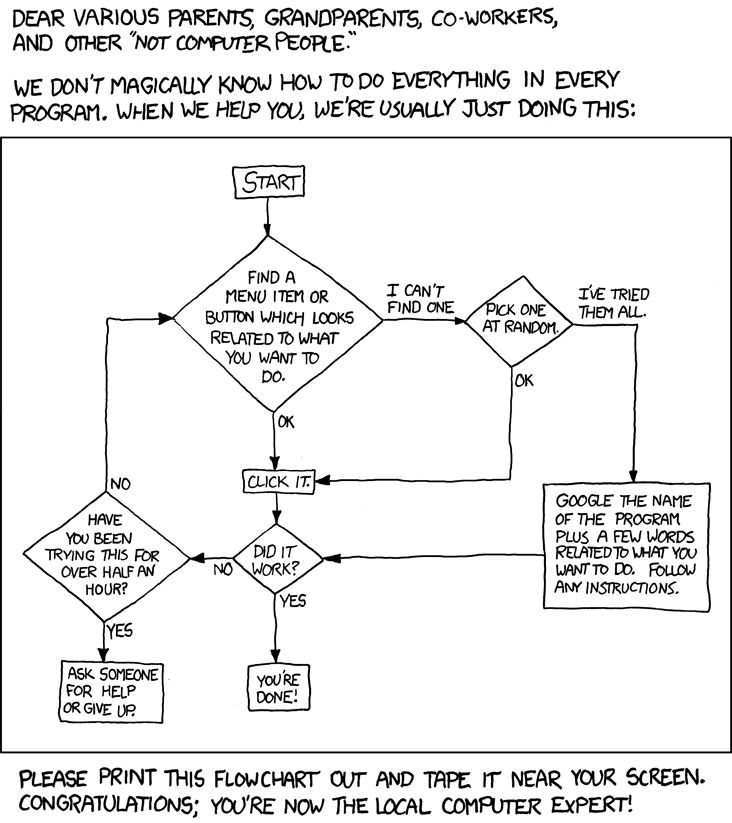
I think the best idea is to use a diagram tool to make it more visual, Dia is pretty good for this. And anyone that did a computer science course last century will be well acquainted with flowcharts.
So to help documentation - and for future reuse this is essential for comprehension and quickly understanding if the code cam be used or not in new projects. Each subroutine is going to get its own flow chart detailing its intended use, what it calls, what it writes, what it reads, code execution.
It might slow me down a bit going back through the code but I think its going to pay dividends later on. Especially as I want to reuse as much of the code as possible in future projects.
kinda like this..
Re: Crap 0.1 first assembly project
I was referring to the LOCAL directive, not the auto local mode.
I've still not seen any way of making it work in context.
-
Ast A. Moore

- Rick Dangerous
- Posts: 2641
- Joined: Mon Nov 13, 2017 3:16 pm
Re: Crap 0.1 first assembly project
To each his own, but I’ve never been partial to multi-source projects. All of mine are single-source (aside from inserting large data files such as fonts, some graphics, etc.). The only place I tend to combine multiple sources is the loader. If you use comments correctly, and your text editor has good search options, I find it much easier to keep track of things when everything is in a single file.Nomad wrote: ↑Fri Jan 12, 2018 7:59 am As an addition to todays progress report, now the project code is starting to get quite large, and having multiple source files. Even with lots of comments and my wibble in this development log even I am starting to find it difficult to keep track of what such and such subroutine does in the program and how it fits into the overall picture.
Versioning also becomes much easier.
Your milage may vary, obviously.
Last edited by Ast A. Moore on Fri Jan 12, 2018 10:38 am, edited 1 time in total.
Every man should plant a tree, build a house, and write a ZX Spectrum game.
Author of A Yankee in Iraq, a 50 fps shoot-’em-up—the first game to utilize the floating bus on the +2A/+3,
and zasm Z80 Assembler syntax highlighter.
Author of A Yankee in Iraq, a 50 fps shoot-’em-up—the first game to utilize the floating bus on the +2A/+3,
and zasm Z80 Assembler syntax highlighter.
Re: Crap 0.1 first assembly project
It is nice to have everything in its place, but then a part of me thinks "when I had a single file I just used to search the file for the label using the editor.. " lol. I do want to try this approach and give it a spin. If I can get on with it then so much the better. But it was worth trying early I think.Ast A. Moore wrote: ↑Fri Jan 12, 2018 9:26 am To each his own, but I’ve never been partial to multi-source projects. All of mine are single-source (aside from inserting large data files such as fonts, some graphics, etc.). The only place I tend to combine multiple sources is the loader. If you use comments correctly, and your text editor has good search options, I find it much easier to keep track of things when everything is in a single file.
Versioning also becomes much easier.
Your milage may vary, obviously.
The version control - Yea actually I think it would make more sense for me to start putting the project on github, that way I don't have to keep pasting lots of code examples. Interested people could just download the whole thing and take a look. Would then be able to study revision histories as you say. But all of this is on another level of organisation than I am currently used to.
I have completed the flow diagram for the multikey input subroutine (the one from the Chuntey blog that I butchered.)

Now I look at the diagram, its not quite correct because it does not show the expected inputs to the subroutine or the subroutine start point, plus if I was to be a real stickler it should have input as an external process to the subroutine lol... plus really I should have annotated the diagram much more. Ah well can always go back when the thing is actually working and make it beautiful.
Here is the press any key subroutine...

Re: Crap 0.1 first assembly project
I never managed to get the LOCAL directive to work either, I spent around 30 mins trying all the variations I could think off and nothing worked - at the time I put it down to me being a potato and just moved on.. But now I suspect that it was a unimplemented feature that got addressed on the down low by using the --alocal. But that is just a conspiracy theory
Project news: well I got paranoid about my flowchart recollections. So decided to see if there was a standard. There is but even better .. Big blues very own guide! and its only 40 pages. So I went with the IBM book. http://web.eah-jena.de/~kleine/history/ ... 8152-1.pdf Will have a read through and make sure my flowcharts are up to scratch.
All joking aside having the subroutines documented in this way is really nice way to get things straight in my head. It's not the fastest way to go but I think its the most comprehensive way to document what I am doing. Put in some effort now when I write (or shamelessly copy paste) a subroutine and it will help spot bugs, and be useful for next time. Also exposes the gaping holes in my understanding of what's going on with the sound generator subroutine that I pilfered from SoundFX. (what are the other 2 values doing... hmmm). That is high on the list of subroutines to flowchart. But I need to figure out what's actually happening first
So this is the print number subroutine,Chuntey's blog once again. This subroutine is just a call to the rom print line number routine. I plan to use it in creating a clone of SoundFX but with less features...

Last edited by Nomad on Fri Jan 12, 2018 4:38 pm, edited 1 time in total.
Re: Crap 0.1 first assembly project
Still needs proc/endp nested inside rept/endm. You can see in the source, parsePROC and parseMACRO push a new "his ambit" (lol) onto the local stack, whereas parseREPT doesn't. Wouldn't be hard to mod it.
Code: Select all
; local.asm

org 32768

L1
		jp L1

Main		PROC
		LOCAL L1
L1
		jp L1
		ENDP

		REPT 4
		PROC
		LOCAL L2
L2
 		jp L2
		ENDP
		ENDM

MyMacro		MACRO
		LOCAL L1
L1
		jp L1
		ENDM

		MyMacro()
		MyMacro()

end 32768
Code: Select all
C:\Users\robin\Documents\Visual Studio 2015\Projects\pasmo\examples>pasmo local.asm local.bin local.txt

C:\Users\robin\Documents\Visual Studio 2015\Projects\pasmo\examples>
Code: Select all
00000000	EQU 08003H
00000001	EQU 08006H
00000002	EQU 08009H
00000003	EQU 0800CH
00000004	EQU 0800FH
00000005	EQU 08012H
00000006	EQU 08015H
L1		EQU 08000H
Main		EQU 08003H

Can coexist wth --alocal option, same results:
Code: Select all
C:\Users\robin\Documents\Visual Studio 2015\Projects\pasmo\examples>pasmo --alocal local.asm local.bin local.txt

C:\Users\robin\Documents\Visual Studio 2015\Projects\pasmo\examples>
Robin Verhagen-Guest
SevenFFF / Threetwosevensixseven / colonel32
NXtel • NXTP • ESP Update • ESP Reset • CSpect Plugins
SevenFFF / Threetwosevensixseven / colonel32
NXtel • NXTP • ESP Update • ESP Reset • CSpect Plugins
Re: Crap 0.1 first assembly project
0.6-pre behaves the same, although that was an extensive rewrite.
Robin Verhagen-Guest
SevenFFF / Threetwosevensixseven / colonel32
NXtel • NXTP • ESP Update • ESP Reset • CSpect Plugins
SevenFFF / Threetwosevensixseven / colonel32
NXtel • NXTP • ESP Update • ESP Reset • CSpect Plugins
Re: Crap 0.1 first assembly project
Day 13: 352 days left..
Today being the 13th day of the project, I figured it was better not to work on code so much and instead streamline the documentation/reference process. my programs go wrong enough without tempting fate.
So project time today will be spent creating flowcharts for all the subroutines so far. To better manage all of the documents I have used tiddlywiki. Its nice I can now search for my subroutines, notes, links to the flowcharts, instruction set reference, memory map.
Before I would just have the rom disassembly book open but this is easier. For code snippets it helps rationalize the process, in the past I just had piles of yellow legal pad paper strewn about willy nilly.
Progress wise, looked into the Rom routine 2D2B a.k.a STACK-BC. Ok I think I understand this routine.
However... the next routine on the list to look at today was 2DE3 a.k.a PRINT A FLOATING POINT NUMBER.
[youtube]https://youtu.be/aNUr__-VZeQ[/youtube]
Aside from the rom routines, looked at the rest of the memory map for the spectrum.
And that was today! Once I have the instruction set, the memory map, and the rom routines in the wiki its going to make work on the project a whole lot easier. having all of the subroutines I use in the programs documented will also help.
I think its not so important for higher level languages unless its a major undertaking but for the assembly unless everything is clearly laid out and recorded its just asking for pain later. How guys could just keep all that information about the instruction set, the memory map and the routines all in their heads is crazy.
Today being the 13th day of the project, I figured it was better not to work on code so much and instead streamline the documentation/reference process.
So project time today will be spent creating flowcharts for all the subroutines so far. To better manage all of the documents I have used tiddlywiki. Its nice I can now search for my subroutines, notes, links to the flowcharts, instruction set reference, memory map.
Before I would just have the rom disassembly book open but this is easier. For code snippets it helps rationalize the process, in the past I just had piles of yellow legal pad paper strewn about willy nilly.
Progress wise, looked into the Rom routine 2D2B a.k.a STACK-BC. Ok I think I understand this routine.
However... the next routine on the list to look at today was 2DE3 a.k.a PRINT A FLOATING POINT NUMBER.
[youtube]https://youtu.be/aNUr__-VZeQ[/youtube]
Aside from the rom routines, looked at the rest of the memory map for the spectrum.
And that was today! Once I have the instruction set, the memory map, and the rom routines in the wiki its going to make work on the project a whole lot easier. having all of the subroutines I use in the programs documented will also help.
I think its not so important for higher level languages unless its a major undertaking but for the assembly unless everything is clearly laid out and recorded its just asking for pain later. How guys could just keep all that information about the instruction set, the memory map and the routines all in their heads is crazy.

Re: Crap 0.1 first assembly project
I believe this is where the problem lays.Joefish wrote: ↑Thu Jan 11, 2018 2:11 pm ...
If I've got a bit of code I want to repeat between REPT / ENDM markers, and I put a label in it, it throws up an error as the label counts as a redefinition the second time it's repeated. But every way I can think of for trying to define the label as local to the REPT macro fails.
You are confusing two concepts, understandbly, because they seem similar, but they are not.
One is a local LABEL, that is limited to the context where it is inserted within.
This is were you use the LOCAL or "_" prefix situations
Another is how to generate DISTINCT labels when using a MACRO.
Here, what you need is to understand how a MACRO works and what the ## operator is for.
A MACRO is just a way to inform the compiler to make Copy&Paste actions (with some optional replace in between), for you.
The manual refers in the Macros Generalities section, the following
This should help you to generate unique and distinct labels when using MACROS.Identifier pasting: inside a MACRO the operator ## can be used to join two idenfiers resulting in another identifier. This is intended to allow the creation of identifiers dependent of macro arguments.
NOTE: you can also use LOCALs on MACROS, if done correctly.
REPT is just a special MACRO. Check the manual.
WARNING: There is a CAVEAT, when using MACROS, basically a MACRO is referenced by it's name, which can be confused by the compiler to be a label, if you have not included the MACRO before using it.
So take that into account.
Re: Crap 0.1 first assembly project
I'm not confusing any of that - I can concatenate names and labels just fine.
What the manual lacks is the syntax for how to use the LOCAL command.
What it seems you need to do is declare your label as local by inserting "LOCAL my_label" on a line within the loop/macro/whatever context, but completely separately from the line where you actually implement the label, e.g "my_label PUSH AF" at the start of your loop or whatever.
Re: Crap 0.1 first assembly project
Yep, exactly. That’s how the parser is coded, for whatever reason.
Robin Verhagen-Guest
SevenFFF / Threetwosevensixseven / colonel32
NXtel • NXTP • ESP Update • ESP Reset • CSpect Plugins
SevenFFF / Threetwosevensixseven / colonel32
NXtel • NXTP • ESP Update • ESP Reset • CSpect Plugins
Re: Crap 0.1 first assembly project
OK, but if you can concatenate names and labels, you can create unique labels everytime you call a MACRO, and this prevents the need for LOCAL labels.Joefish wrote: ↑Mon Jan 15, 2018 2:17 pm I'm not confusing any of that - I can concatenate names and labels just fine.
What the manual lacks is the syntax for how to use the LOCAL command.
What it seems you need to do is declare your label as local by inserting "LOCAL my_label" on a line within the loop/macro/whatever context, but completely separately from the line where you actually implement the label, e.g "my_label PUSH AF" at the start of your loop or whatever.
We only need LOCAL labels, if somehow we want to use the EXACT same label elsewhere, in a different context.
Because that is the only use case for LOCAL labels.
And if you start to use MACROS that call MACROS you can get into trouble again easily, with either duplicated definitions or unknown labels, when inside a MACRO within another MACRO.
I usualy favor global Labels, parameterized (PREFIX or POSTFIX) to be unique.
Re: Crap 0.1 first assembly project
Day 24: 341 days left..
Bet ya thought I had abandoned the project No, just my internet connection hates me. In the intervening 11 days went about things old school hitting the books while I was unable to access
the 'world wide web'.
It's surprising what a push that gave things actually, I got all of the graphics finished for crap chess, re-factored the code, created an animated intro screen and played around with a tech demo for copying board layouts from memory. (that was for something completely different but then it struck me this was exactly what I needed for crapchess and controlling the screen!)
Well despite this progress things have been slow, with a combination of no internet and the cat sabotaging my laptop any chance he gets. Its at times like these it shows just how dependent we all have become on the net for a research tool. There were tons of times I was catching myself trying to go onto google to solve a pickle I was in.
In the end I just had to hit the books (usually pointless for specifics) or just brute force a solution by trying every variation of a routine I could to try and get it to work. That is how the board copier 'spawned'. The code is not the prettiest, having used all of the registers already and not really understanding enough to get me out of trouble and the books giving woolly ivory tower explanations like 'manage your stack' I just used memory locations to store variables.
It was at this point I discovered what was worst than spaghetti goto code... tons of magic numbers for memory locations with values sprinkled willy nilly. Somehow it worked. but I shudder thinking about it...
Music was something that brought a little sanity into the mix. I composed a few little ditties on beepola but the issue was first getting it to load in the program. For very short music its ok. But when things got long or complicated the size of the file was ballooning to 12-15k. When I tried to add it to crap chess I suspect there is not enough room.
I can get the simple tracks to play continuously at the start of the program, but trying the NEXTNOTE code my potato brain seems to not be able to get it to work right.
For crapchess I want to get the background ditty down to a more manageable level so I can have it playing in the background during the game. But I guess its not the end of the world if there is no music.

The other way around this is to radically redactor the code, take out my potato beginners memory mistakes and get the space i need that way.. I am getting to the point where I did everything I can by myself. A little bit of polish I think I can learn a lot from seeing how someone would fix my mess of a program
A big part of the problem is routines that I have just copy pasta'ed into the project that I don't really understand that use/affect registers. This stops basic stuff like DJNZ working as expected and making me having to resort to non-loopy methods to get things to work. If I could figure out how to preserve the registers, do my loops and replace them I could go on a re-factoring rampage
Still while its been frustrating and many times I felt like I was making little progress, at the end of the 11 days I am much further along than when I started. The dragon warrior tile loader was something I couldn't have done at the start of this project. I think its the first time I really sat down and thought 'ooh I did that, damn'
Whole reason behind the tech demo was I was getting cheesed off looking at the same damn green and white board and ugly chessmen every day. Needed something new to fire my braincells. So I figured why not do a tile loader for one of my fav games, dragon quest.
As a project its totally beyond my ability to code, but for stuff like proof of concept and tech demos to teach myself its ok. One day I will make it.
OUTCOMES:
All sprites are done and in the bag, have a number of new routines to handle screen stuff like timers, player indicator, the animated screens, some music. And of course loading the tiles from a list of values in a memory location that can be updated in real time.
Other things that got completed - pause functions, these were used in the animation sequence for the start screen. I wanted to avoid fitting in the viewers so needed to slow down the rate that the attribute data was switched. Sadly this took almost a day of fiddling to get right, all the time I was cursing my internet thinking how easy it would have been to have gotten a solution with google. Still watching the little animation wiggle on the screen was satisfaction at the end of the day.
The animation is just two attribute pages, I got the idea from a spectrum book - that in turn was exposing a 'trade secret' from 1984 I thought 'ooh 768x2 bytes' that sure beats 12.2k.. I want some of that action.
That was a great learning tool. Its a very simple technique but looks nice. I am no artist anyway so attribute blocks are more my speed.
Still to do..
I need to figure out what is going on with the input routine, it must be some problem with the way the project is set up but I can't get the multi input routines to work in the program from how to write spectrum games. As a sanity check I wrote out the example game that the code was used in and it works ok. So it must be my project and not a book that has been used by thousands of people to code spectrum games (but at 3am when nothing is working, these dark thoughts enter the mind none-the-less..)
Will implement the routine from the dragon quest tile loader into crap-chess. It should be easier as its only 8x8 locations compared to 16x12.. (famous last words).


One thing I wanted to master was how to have menus appear on the screen. I have achieved this in a simplistic potato way, but I need to learn masking so the ugly edges can be hidden and it blends better into the scene. At the moment I am just replacing the tiles with blanks. But that is not an elegent solution I think. And still suffering from a lack of loops in my life.
the code for the tech demo is bellow, you can see its hot mess of non-optimised stuff. I would like to learn how to make it better and more efficient. Figure out how to really master this looping business and taking care of my registers instead of praying that I don't negatively impact the rest of the program every time I make a change haha.
I have been trying to get the graphic tile printer (ROLF) to also adjust the attribute memory at the same time but not been having any luck. I remember one of the spectrum books had a routine to determine the attr location of any point on screen so It would be a matter of trying to get the attr from the tile printing function..
What I have been trying and failing to do is read the memory locations starting from 32000 -> 32192 that contain all of the tiles on the screen at the time. The idea is I just poke values into these locations when I want to update the screen and as the code can read the locations and print to the screen it should update whenever the memory is changed. This all works.
But What I can't get to work is a simple nestled loop so that the outer loop handles the rows (12) and the inner loop handles the columns (16). to print the tiles on the screen. At the moment I am having to use the manual method of a kind of half way house between a loop and a mess.
The other thing I cannot get to work is a attribute 'diddler', what I want it to do as its reading the value of the memory location, it at the same time as printing the tile, also updates that locations attribute value from a CP ladder. I have tried and I can't seem to figure out a way to get it to work.
So for example, the brick floor, chest should be red paper, black ink, the walls should be white, the sea blue, the grass, trees, green, well you get the idea.
While this is a perfect project for a NIRVANA program, I just want to get the basics down first before jumping off the deep end.
Bet ya thought I had abandoned the project
the 'world wide web'.
It's surprising what a push that gave things actually, I got all of the graphics finished for crap chess, re-factored the code, created an animated intro screen and played around with a tech demo for copying board layouts from memory. (that was for something completely different but then it struck me this was exactly what I needed for crapchess and controlling the screen!)
Well despite this progress things have been slow, with a combination of no internet and the cat sabotaging my laptop any chance he gets. Its at times like these it shows just how dependent we all have become on the net for a research tool. There were tons of times I was catching myself trying to go onto google to solve a pickle I was in.
In the end I just had to hit the books (usually pointless for specifics) or just brute force a solution by trying every variation of a routine I could to try and get it to work. That is how the board copier 'spawned'. The code is not the prettiest, having used all of the registers already and not really understanding enough to get me out of trouble and the books giving woolly ivory tower explanations like 'manage your stack'
It was at this point I discovered what was worst than spaghetti goto code... tons of magic numbers for memory locations with values sprinkled willy nilly. Somehow it worked. but I shudder thinking about it...
Music was something that brought a little sanity into the mix. I composed a few little ditties on beepola but the issue was first getting it to load in the program. For very short music its ok. But when things got long or complicated the size of the file was ballooning to 12-15k. When I tried to add it to crap chess I suspect there is not enough room.
I can get the simple tracks to play continuously at the start of the program, but trying the NEXTNOTE code my potato brain seems to not be able to get it to work right.
For crapchess I want to get the background ditty down to a more manageable level so I can have it playing in the background during the game. But I guess its not the end of the world if there is no music.
The other way around this is to radically redactor the code, take out my potato beginners memory mistakes and get the space i need that way.. I am getting to the point where I did everything I can by myself. A little bit of polish I think I can learn a lot from seeing how someone would fix my mess of a program
A big part of the problem is routines that I have just copy pasta'ed into the project that I don't really understand that use/affect registers. This stops basic stuff like DJNZ working as expected and making me having to resort to non-loopy methods to get things to work. If I could figure out how to preserve the registers, do my loops and replace them I could go on a re-factoring rampage
Still while its been frustrating and many times I felt like I was making little progress, at the end of the 11 days I am much further along than when I started. The dragon warrior tile loader was something I couldn't have done at the start of this project. I think its the first time I really sat down and thought 'ooh I did that, damn'
Whole reason behind the tech demo was I was getting cheesed off looking at the same damn green and white board and ugly chessmen every day. Needed something new to fire my braincells. So I figured why not do a tile loader for one of my fav games, dragon quest.
As a project its totally beyond my ability to code, but for stuff like proof of concept and tech demos to teach myself its ok. One day I will make it.
OUTCOMES:
All sprites are done and in the bag, have a number of new routines to handle screen stuff like timers, player indicator, the animated screens, some music. And of course loading the tiles from a list of values in a memory location that can be updated in real time.
Other things that got completed - pause functions, these were used in the animation sequence for the start screen. I wanted to avoid fitting in the viewers so needed to slow down the rate that the attribute data was switched. Sadly this took almost a day of fiddling to get right, all the time I was cursing my internet thinking how easy it would have been to have gotten a solution with google. Still watching the little animation wiggle on the screen was satisfaction at the end of the day.
The animation is just two attribute pages, I got the idea from a spectrum book - that in turn was exposing a 'trade secret' from 1984
That was a great learning tool. Its a very simple technique but looks nice. I am no artist anyway so attribute blocks are more my speed.
Still to do..
I need to figure out what is going on with the input routine, it must be some problem with the way the project is set up but I can't get the multi input routines to work in the program from how to write spectrum games. As a sanity check I wrote out the example game that the code was used in and it works ok. So it must be my project and not a book that has been used by thousands of people to code spectrum games
Will implement the routine from the dragon quest tile loader into crap-chess. It should be easier as its only 8x8 locations compared to 16x12.. (famous last words).
One thing I wanted to master was how to have menus appear on the screen. I have achieved this in a simplistic potato way, but I need to learn masking so the ugly edges can be hidden and it blends better into the scene. At the moment I am just replacing the tiles with blanks. But that is not an elegent solution I think. And still suffering from a lack of loops in my life.
the code for the tech demo is bellow, you can see its hot mess of non-optimised stuff. I would like to learn how to make it better and more efficient. Figure out how to really master this looping business and taking care of my registers instead of praying that I don't negatively impact the rest of the program every time I make a change haha.
I have been trying to get the graphic tile printer (ROLF) to also adjust the attribute memory at the same time but not been having any luck. I remember one of the spectrum books had a routine to determine the attr location of any point on screen so It would be a matter of trying to get the attr from the tile printing function..
Code: Select all
ORG 33000

MAIN:

    ; SETS MEMORY LOCATION 50000 TO 0 AND 50001 TO 0, USED IN PRINT TILE. B C

    LD A,1
    LD (60000),A
    LD A,120
    LD (23693),A
    CALL 3503
    LD A,0
    CALL 8859

GAMELOOP:
    LD A,0
    LD HL,40000
    LD (HL),0
    INC HL
    LD (HL),0
    INC HL
    LD (HL),32000
    CALL SETMAP
    ;CALL MENUS
    CALL DRAWMAP
    JP GAMELOOP

MENUS:
; 20 IS LEFT TOP CORNER, 21 IS RIGHT TOP CORNER
; 22 IS LEFT BOTTOM CORNER, 23 IS RIGHT BOTTOM CORNER
; 24 IS VERTICAL, 25 HORIZONTAL
        LD A,25
        LD (32017),A
        LD A,25
        LD (32018),A
        LD A,25
        LD (32019),A
        LD A,25
        LD (32020),A
        LD A,21
        LD (32021),A
        LD A,20
        LD (32016),A
        LD A,24
        LD (32032),A
        LD A,26
        LD (32033),A
        LD A,26
        LD (32034),A
        LD A,26
        LD (32035),A
        LD A,26
        LD (32036),A
        LD A,24
        LD (32048),A
        LD A,26
        LD (32049),A
        LD A,26
        LD (32050),A
        LD A,26
        LD (32051),A
        LD A,26
        LD (32052),A
        LD A,24
        LD (32064),A
        LD A,26
        LD (32065),A
        LD A,26
        LD (32066),A
        LD A,26
        LD (32067),A
        LD A,26
        LD (32068),A
        LD A,24
        LD (32080),A
        LD A,26
        LD (32081),A
        LD A,26
        LD (32082),A
        LD A,26
        LD (32083),A
        LD A,26
        LD (32084),A
        LD A,24
        LD (32096),A
        LD A,26
        LD (32097),A
        LD A,26
        LD (32098),A
        LD A,26
        LD (32099),A
        LD A,26
        LD (32100),A
        LD A,22
        LD (32112),A
        LD A,25
        LD (32113),A
        LD A,25
        LD (32114),A
        LD A,25
        LD (32115),A
        LD A,25
        LD (32116),A
        LD A,23
        LD (32117),A
        LD A,24
        LD (32101),A
        LD A,24
        LD (32085),A
        LD A,24
        LD (32069),A
        LD A,24
        LD (32053),A
        LD A,24
        LD (32037),A
        LD A,21
        LD (32021),A
        RET

DRAWTILE:   ;ARRIVE HL POINTING AT TILE GRAPHIC, DE AT SCREEN MEMORY
    LD B,16     ;LOOP COUNTER FOR 16 PX HIGH TILE
DRAWTILELOOP:
    LD A,(HL)   ;GET BYTE OF GRAPHIC
    LD (DE),A   ;PLONK IT IN SCREEN MEMORY
    INC HL      ;NEXT BYTE OF GRAPHIC
    INC E       ;NEXT COLUMN OF SCREEN
    LD A,(HL)   ;RIGHT HAND SIDE OF TILE
    LD (DE),A
    INC HL      ;NEXT BYTE OF GRAPHIC
    DEC E       ;BACK TO LEFT HAND SIDE OF TILE
    CALL NEXTLINEDOWN   ;MOVE DE DOWN ONE SCREEN LINE
    DJNZ DRAWTILELOOP
    RET
    ;
NEXTLINEDOWN:   ;ARRIVE DE AT SCREEN ADDRESS, MOVE IT DOWN ONE PIXEL LINE
    INC D
    LD A,D
    AND 7
    RET NZ
    LD A,E
    ADD A,32
    LD E,A
    RET C
    LD A,D
    SUB 8
    LD D,A
    RET

YX2CELL:    ;arrive with b=y column 0-23, c=x column 0-31, point DE at corresponding screen address
    LD A,B
    RRCA
    RRCA
    RRCA
    AND 224
    OR C
    LD E,A
    LD A,B
    AND 24
    OR 64
    LD D,A
    RET

FOREST:
        CALL YX2CELL
        LD HL,TILE_FORREST
        CALL DRAWTILE
        RET

SEA:
        CALL YX2CELL
        LD HL,TILE_SEA
        CALL DRAWTILE
        RET

GRASS:
        CALL YX2CELL
        LD HL,TILE_GRASS
        CALL DRAWTILE
        RET

VLINE:
        CALL YX2CELL
        LD HL,TILE_VLINE
        CALL DRAWTILE
        RET

HLINE:
        CALL YX2CELL
        LD HL,TILE_HLINE
        CALL DRAWTILE
        RET

TLCOR:
        CALL YX2CELL
        LD HL,TILE_TLCOR
        CALL DRAWTILE
        RET

TRCOR:
        CALL YX2CELL
        LD HL,TILE_TRCOR
        CALL DRAWTILE
        RET

BLCOR:
        CALL YX2CELL
        LD HL,TILE_BLCOR
        CALL DRAWTILE
        RET

BRCOR:
        CALL YX2CELL
        LD HL,TILE_BRCOR
        CALL DRAWTILE
        RET

WALL:
        CALL YX2CELL
        LD HL,TILE_WALL
        CALL DRAWTILE
        RET

BRICKFLOOR:
        CALL YX2CELL
        LD HL,TILE_FLOOR
        CALL DRAWTILE
        RET

STAIRSU:
        CALL YX2CELL
        LD HL,TILE_STAIRSU
        CALL DRAWTILE
        RET

STAIRSD:
        CALL YX2CELL
        LD HL,TILE_STAIRSD
        CALL DRAWTILE
        RET


TABLE:
        CALL YX2CELL
        LD HL,TILE_TABLE
        CALL DRAWTILE
        RET

DOOR:
        CALL YX2CELL
        LD HL,TILE_DOOR
        CALL DRAWTILE
        RET

MOUNTAIN:
        CALL YX2CELL
        LD HL,TILE_MOUNTAIN
        CALL DRAWTILE
        RET
HILLS:
        CALL YX2CELL
        LD HL,TILE_HILLS
        CALL DRAWTILE
        RET
STRIPES:
        CALL YX2CELL
        LD HL,TILE_STRIPES
        CALL DRAWTILE
        RET

SWAMP:
        CALL YX2CELL
        LD HL,TILE_SWAMP
        CALL DRAWTILE
        RET

CHEST:
        CALL YX2CELL
        LD HL,TILE_CHEST
        CALL DRAWTILE
        RET

INN:
        CALL YX2CELL
        LD HL,TILE_INN
        CALL DRAWTILE
        RET

ARMOURER:
        CALL YX2CELL
        LD HL,TILE_ARMOURER
        CALL DRAWTILE
        RET

OLDMAN:
        CALL YX2CELL
        LD HL,TILE_OLDMAN
        CALL DRAWTILE
        RET

GUARD:
        CALL YX2CELL
        LD HL,TILE_GUARD
        CALL DRAWTILE
        RET

KING:
        CALL YX2CELL
        LD HL,TILE_KING
        CALL DRAWTILE
        RET

TOWNSPEOPLE:
        CALL YX2CELL
        LD HL,TILE_TOWNSPEOPLE
        CALL DRAWTILE
        RET

TBLANK:
        CALL YX2CELL
        LD HL,TILE_BLANK
        CALL DRAWTILE
        RET

PLAYER:
        CALL YX2CELL
        LD HL,TILE_PLAYER
        CALL DRAWTILE
        RET


SETMAP:              ; sets the main screen background
       LD BC,192             ; length of block to copy
       LD HL,ROOM_TANTEGEL_1_2           ; source address
       LD DE,32000             ; destination address
       LDIR                    ; copy BC bytes from HL to DE

       RET

ROLF:

       CP 0
       JP Z,BRICKFLOOR
       CP 1
       JP Z,WALL
       CP 2
       JP Z,STAIRSU
       CP 3
       JP Z,GRASS
       CP 4
       JP Z,SEA
       CP 5
       JP Z,FOREST
       CP 6
       JP Z,TABLE
       CP 7
       JP Z,DOOR
       CP 8
       JP Z,STAIRSD
       CP 9
       JP Z,MOUNTAIN
       CP 10
       JP Z,HILLS
       CP 11
       JP Z,STRIPES
       CP 12
       JP Z,SWAMP
       CP 13
       JP Z,INN
       CP 14
       JP Z,OLDMAN
       CP 15
       JP Z,GUARD
       CP 16
       JP Z,KING
       CP 17
       JP Z,TOWNSPEOPLE
       CP 18
       JP Z,CHEST
       CP 19
       JP Z,ARMOURER
       CP 20
       JP Z,TLCOR
       CP 21
       JP Z,TRCOR
       CP 22
       JP Z,BLCOR
       CP 23
       JP Z,BRCOR
       CP 24
       JP Z,VLINE
       CP 25
       JP Z,HLINE
       CP 26
       JP Z,TBLANK
       CP 99
       JP Z,PLAYER
       RET                     ; return

ROO16:
        LD IX,16
NMFR:
        CALL ROO
        CALL ROO
        CALL ROO
        CALL ROO
        CALL ROO
        CALL ROO
        CALL ROO
        CALL ROO
        CALL ROO
        CALL ROO
        CALL ROO
        CALL ROO
        CALL ROO
        CALL ROO
        CALL ROO
        CALL ROO
        DEC (IX)
        LD e,(IX)
        CP 0
        JP Z,NMFR
        RET

DRAWMAP:

        LD IY,32000
        LD A,0
        LD (50000),A
        LD A,0
        LD (50002),A

        CALL ROO16

        LD A,2
        LD (50000),A
        LD A,0
        LD (50002),A
        CALL ROO16

        LD A,4
        LD (50000),A
        LD A,0
        LD (50002),A
        CALL ROO16

        LD A,6
        LD (50000),A
        LD A,0
        LD (50002),A
        CALL ROO16

        LD A,8
        LD (50000),A
        LD A,0
        LD (50002),A
        CALL ROO16

        LD A,10
        LD (50000),A
        LD A,0
        LD (50002),A
        CALL ROO16

        LD A,12
        LD (50000),A
        LD A,0
        LD (50002),A
        CALL ROO16

        LD A,14
        LD (50000),A
        LD A,0
        LD (50002),A
        CALL ROO16

        LD A,16
        LD (50000),A
        LD A,0
        LD (50002),A
        CALL ROO16

        LD A,18
        LD (50000),A
        LD A,0
        LD (50002),A
        CALL ROO16

        LD A,20
        LD (50000),A
        LD A,0
        LD (50002),A
        CALL ROO16

        LD A,22
        LD (50000),A
        LD A,0
        LD (50002),A
        CALL ROO16
        RET

ROO:
        LD A,(50000)
        LD B,A
        LD (50000),A
        LD A,(50002)
        LD C,A
        ADD A,2
        LD (50002),A
        LD A,(IY)
        CALL ROLF
        INC IY
        RET

;Tantegel castle Top left. (1 of 6)

ROOM_TANTEGEL_2_1:
    DEFB    1,1,1,1,1,1,1,1,1,1,1,1,1,1,1,1
    DEFB    1,1,1,1,1,1,1,1,1,1,1,1,1,1,1,1
    DEFB    1,1,1,1,1,1,1,1,1,1,1,1,1,1,1,1
    DEFB    1,1,1,1,0,0,0,0,0,18,0,0,1,1,1,1
    DEFB    1,1,1,1,0,6,6,6,6,6,6,0,1,1,1,1
    DEFB    1,1,1,1,0,6,16,6,6,0,6,0,1,1,1,1
    DEFB    1,1,1,1,0,0,0,18,18,0,0,0,1,1,1,1
    DEFB    1,1,1,1,0,0,0,0,0,0,0,15,1,1,1,1
    DEFB    1,1,1,1,0,0,15,0,15,0,0,0,1,1,1,1
    DEFB    1,1,1,1,1,1,1,7,1,1,1,1,1,1,1,1
    DEFB    1,1,1,1,0,0,0,0,0,0,0,8,1,1,1,1
    DEFB    1,1,1,1,1,1,1,1,1,1,1,1,1,1,1,1
ROOM_TANTEGEL_1_1:
    DEFB    3,3,3,3,3,3,3,3,3,3,3,3,3,3,3,3
    DEFB    3,1,1,1,1,1,1,1,3,3,3,3,3,3,3,3
    DEFB    3,1,0,0,0,0,0,1,3,5,3,5,5,3,5,3
    DEFB    3,1,0,0,0,0,0,1,3,3,3,3,3,3,3,3
    DEFB    3,1,0,0,1,0,0,1,1,1,1,0,0,1,1,1
    DEFB    3,1,0,0,0,0,0,15,0,0,0,0,0,0,0,0
    DEFB    3,1,0,0,0,0,0,1,1,1,1,1,1,1,1,1
    DEFB    3,1,1,1,1,1,0,1,15,0,0,0,0,0,0,0
    DEFB    3,1,0,0,0,1,0,1,2,0,0,0,0,0,1,0
    DEFB    3,1,0,17,0,0,0,1,15,0,0,0,0,0,0,0
    DEFB    3,1,0,0,0,1,0,1,1,1,0,0,0,0,1,1
    DEFB    3,1,1,1,1,1,0,1,5,5,0,0,0,0,5,5

ROOM_TANTEGEL_1_2:
    DEFB    3,1,0,0,0,1,0,1,5,5,0,0,0,0,5,5
    DEFB    3,1,0,0,15,1,0,1,5,3,0,0,0,0,3,5
    DEFB    3,1,18,0,0,7,17,1,3,3,0,0,0,0,3,3
    DEFB    3,1,0,18,0,1,0,1,3,3,0,0,0,0,3,3
    DEFB    3,1,18,0,18,1,0,1,3,0,0,0,0,0,0,3
    DEFB    3,1,1,1,1,1,0,1,3,0,4,4,4,4,0,3
    DEFB    3,1,0,0,0,0,0,0,0,0,4,11,11,4,0,0
    DEFB    3,1,0,0,0,0,0,0,0,0,4,11,11,4,0,0
    DEFB    3,1,1,1,0,0,1,1,1,0,4,4,4,4,0,1
    DEFB    3,1,0,0,0,0,0,0,1,0,0,0,0,0,0,1
    DEFB    3,1,0,0,0,0,0,0,1,1,0,0,0,0,1,1
    DEFB    3,1,0,0,1,0,0,0,0,1,0,0,0,0,1,0

TILE_FLOOR:
    DEFB      8,  8,  8,  8,255,255,128,128
    DEFB    128,128,128,128,255,255,  8,  8
    DEFB      8,  8,  8,  8,255,255,128,128
    DEFB    128,128,128,128,255,255,  8,  8
    DEFB     16, 16, 16, 16

TILE_WALL:
    DEFB    252, 63,200, 19,128,  1,144,  1
    DEFB    224,  1,184,  1,204,  5,166,  3
    DEFB    192,  1,160,  1,176,  1,209, 83
    DEFB    194, 37,230, 17,200, 11,255,255
    DEFB     56, 56, 56, 56

TILE_CHEST:
    DEFB      0,  0,  0,  0,115,156,127,252
    DEFB    241,140,216,198,140, 99,140, 99
    DEFB    255,255,140, 99,141,251,141, 11
    DEFB    141,251,204, 99,236, 99,255,255
    DEFB     16, 16, 16, 16

TILE_SWAMP:
    DEFB    189,219,218,107,167, 53, 52,134
    DEFB    219,181,169, 85,118,203,101,106
    DEFB    139, 21,108,237,149, 52,209,163
    DEFB    237,157, 21,110,182,181,185,219
    DEFB      4,  4,  4,  4

TILE_FORREST:
    DEFB     24, 24, 62, 52,117,122,254,255
    DEFB    250,253,255,251,254,253,247,253
    DEFB    253,123,251,254,255,247,110,126
    DEFB     60, 56, 24, 24,126,126,  0,  0
    DEFB     32, 32, 32, 32

TILE_INN:
    DEFB    255,255,  0,  0,255,255,247,239
    DEFB    128,  1,128,  1,172,165,172,165
    DEFB    170,181,170,181,169,173,169,173
    DEFB    168,165,168,165,128,  1,255,255
    DEFB     56, 56, 56, 56

TILE_ARMOURER:
    DEFB    255,255,248, 57,243,145,228, 99
    DEFB    204, 71,158,139,175, 29,166, 53
    DEFB    164,101,232,245,153,253,207, 57
    DEFB    198, 19,147,231, 58, 15,127,255
    DEFB     56, 56, 56, 56

TILE_STAIRSU:
    DEFB    244,  4, 20,  4, 31,  4, 17,244
    DEFB     17, 31, 17, 17, 17, 17, 17, 17
    DEFB     17, 17, 17, 17, 17, 17, 17, 17
    DEFB    241, 17,255, 17,255,241,255,255
    DEFB     56, 56, 56, 56

TILE_STAIRSD:
    DEFB    255,255, 31,255, 31,255, 31,255
    DEFB     17,255, 17,255, 17,255, 17, 31
    DEFB     17, 31, 17, 31, 17, 19, 17, 19
    DEFB     17, 19, 17, 18, 17, 18, 17, 18
    DEFB     56, 56, 56, 56

TILE_SEA:
    DEFB      0,  0,  0,  0, 60, 56, 30, 28
    DEFB      0,  0,  7,192,  3,248,  0,192
    DEFB      0,  0,  0,  0, 96,  0, 49,192
    DEFB      0,248,  0,  0,  0,  0,  0,  0
    DEFB     15, 15, 15, 15

TILE_MOUNTAIN:
    DEFB      6,  0,  5,  0,  4,176, 12,232
    DEFB      9,136, 24,196, 16,132, 35,148
    DEFB     33,212, 47, 54,103,146,110,218
    DEFB    100,138, 76,218, 56, 78, 31,248
    DEFB     56, 56, 56, 56

TILE_HILLS:
    DEFB      0,  0,  0,  0,  0,  0,  0,  0
    DEFB      0,224,  3,208,  6,136,  8,196
    DEFB     49, 98, 68, 49, 74,153,114,158
    DEFB     62, 48,  3, 32,  1,192,  0,  0
    DEFB     32, 32, 32, 32

TILE_GRASS:
    DEFB      0,  2, 40, 32, 72, 68,  0,  4
    DEFB     16,129, 33,  8,  0, 18,100, 16
    DEFB     68,  2,  8,  2,  0, 64,  8,132
    DEFB     32,  8, 65,  1, 18, 24, 32, 32
    DEFB     48, 48, 48, 48

TILE_STRIPES:
    DEFB    227,142,199, 28,142, 56, 28,113
    DEFB     56,227,113,199,227,142,199, 28
    DEFB    142, 56, 28,113, 56,227,113,199
    DEFB    227,142,199, 28,142, 56, 28,113
    DEFB     49, 49, 49, 49

TILE_TABLE:
    DEFB    255,255,128,  1,191,253,160,  5
    DEFB    160,  5,160,  5,160,  5,160,  5
    DEFB    160,  5,160,  5,160,  5,160,  5
    DEFB    160,  5,191,253,128,  1,255,255
    DEFB     48, 48, 48, 48

TILE_DOOR:
    DEFB      0,  0, 31,248, 51,204, 97,134
    DEFB     65,130,193,131,129,129,145,137
    DEFB    145,137,185,157,255,255,129,129
    DEFB    129,129,129,129,129,129,255,255
    DEFB     56, 56, 56, 56

TILE_VLINE:
    DEFB      1,128,  1,128,  1,128,  1,128
    DEFB      1,128,  1,128,  1,128,  1,128
    DEFB      1,128,  1,128,  1,128,  1,128
    DEFB      1,128,  1,128,  1,128,  1,128
    DEFB     56, 56, 56, 5

TILE_HLINE:
    DEFB      0,  0,  0,  0,  0,  0,  0,  0
    DEFB      0,  0,  0,  0,  0,  0,255,255
    DEFB    255,255,  0,  0,  0,  0,  0,  0
    DEFB      0,  0,  0,  0,  0,  0,  0,  0
    DEFB     56, 56, 56, 56

TILE_TLCOR:
    DEFB      0,  0,  0,  0,  0,  0,  0,  0
    DEFB      0,  0,  0,  0,  0,  0,  0,255
    DEFB      1,255,  1,128,  1,128,  1,128
    DEFB      1,128,  1,128,  1,128,  1,128
    DEFB     56, 56, 56, 56

TILE_TRCOR:
    DEFB      0,  0,  0,  0,  0,  0,  0,  0
    DEFB      0,  0,  0,  0,  0,  0,255,  0
    DEFB    255,128,  1,128,  1,128,  1,128
    DEFB      1,128,  1,128,  1,128,  1,128
    DEFB     56, 56, 56, 56

TILE_BRCOR:
    DEFB      1,128,  1,128,  1,128,  1,128
    DEFB      1,128,  1,128,  1,128,255,128
    DEFB    255,  0,  0,  0,  0,  0,  0,  0
    DEFB      0,  0,  0,  0,  0,  0,  0,  0
    DEFB     56, 56, 56, 56

TILE_BLCOR:
    DEFB      1,128,  1,128,  1,128,  1,128
    DEFB      1,128,  1,128,  1,128,  1,255
    DEFB      0,255,  0,  0,  0,  0,  0,  0
    DEFB      0,  0,  0,  0,  0,  0,  0,  0
    DEFB     56, 56, 56, 56

TILE_PLAYER:
    DEFB    255,255,248, 31,240, 15,224,  7
    DEFB    238,119,224,  7,206,115,202, 83
    DEFB    206,115,192,  3,162, 69, 96,  6
    DEFB    243,207,249,159,252, 63,255,255
    DEFB     56, 56, 56, 56

TILE_OLDMAN:
    DEFB      1,224,  2, 56,  6, 14, 12,  2
    DEFB      8, 51, 63,253, 20, 31, 52, 48
    DEFB     24,112, 17,216, 31,  8, 48, 12
    DEFB     35,  4, 46,  4, 56, 12, 16,  8
    DEFB     56, 56, 56, 56

TILE_GUARD:
    DEFB      3,240,  6, 20, 12, 20,  8, 20
    DEFB      8, 20, 31, 22, 21, 20, 53, 20
    DEFB     25,244, 17, 28, 31,  4,112,228
    DEFB     32,164, 40,228, 56,140, 18,  8
    DEFB     56, 56, 56, 56

TILE_KING:
    DEFB      0,  0,  2,168,  5, 84,  8,  2
    DEFB      8,  2, 30,  4, 53,  4, 33,  4
    DEFB     23,  4, 61,252, 34,  4,124,164
    DEFB     96,164, 40,196, 56,172, 18,  8
    DEFB     56, 56, 56, 56

TILE_TOWNSPEOPLE:
    DEFB      0,  0, 15,240,  8, 92,  8,212
    DEFB      8, 20, 30, 52, 53,  4, 39,  4
    DEFB     23,  4, 61,252, 34,  4, 61,250
    DEFB     17, 18,  9, 20,  8,172, 18, 72
    DEFB     56, 56, 56, 56

TILE_BLANK:
    DEFB     0,0,0,0,0,0,0,0
    DEFB     0,0,0,0,0,0,0,0
    DEFB     0,0,0,0,0,0,0,0
    DEFB     0,0,0,0,0,0,0,0
    DEFB     0,0,0,0

END MAIN
But What I can't get to work is a simple nestled loop so that the outer loop handles the rows (12) and the inner loop handles the columns (16). to print the tiles on the screen. At the moment I am having to use the manual method of a kind of half way house between a loop and a mess.
The other thing I cannot get to work is a attribute 'diddler', what I want it to do as its reading the value of the memory location, it at the same time as printing the tile, also updates that locations attribute value from a CP ladder. I have tried and I can't seem to figure out a way to get it to work.
So for example, the brick floor, chest should be red paper, black ink, the walls should be white, the sea blue, the grass, trees, green, well you get the idea.
While this is a perfect project for a NIRVANA program, I just want to get the basics down first before jumping off the deep end.